Git for Subversion users
There are quite a few topics that a standard university computer science curriculum doesn't even touch upon that are nevertheless critical to the practice of programming. SQL is one, source code control is another. As a professional developer, you're assumed to know how and when to use it and to be well-versed in branching patterns and strategies, even though all of us learned version control via the sink-or-swim technique on the job.
My first exposure to version control was, accordingly, in my first real job, where we used RCS. RCS
stands for Revision Control System and was actually originally designed for a single user,
but could be (painfully) adapted to fit a multi-user scenario. I later graduated from RCS to CVS (Concurrent
Version System), which was much
better in that it was actually designed with multiple users cooperating on a shared network in mind. CVS,
though, started to lose mindshare in the early part of the 21st century to a fairly compatible competitor
named Subversion (often abbreviated SVN because, evidently, all of its predecessors had TLA's
too).
RCS, CVS and SVN all had similar ideas about how version control should be accomplished. Their philosophy starts from the basis that computer programs are made up of multiple source code files that are compiled and combined together to produce an executable. As new features are added to the executable, bits and pieces of various source code files are edited and tested to produce a new version of an executable. So, then, if you keep track of each state of each source file, you can fall back to an older version, or release, of an executable. The job of the version control system is to keep track of all of the changes to the source code files.
It was up to the individual developer, of course, to determine which changes "went together". In a collaborative environment, then, the developer would check out the codebase by copying it to his local machine. As he made changes to the checked out code, he would periodically check in coherent (hopefully) changesets which would be tracked by the revision control system's centralized server and made available to other users. Occasionally, two developers would change the same line of the same file simultaneously and generate a conflict - in general, it was up to the unlucky second committer to resolve the conflict in this scenario.
Subversion, like CVS (and even RCS) before it, were developed around a particular project lifecycle: projects were initialized into the central server and then developers checked out/downloaded them, modified and tested them locally, and checked in/uploaded them when they were satisfied with the changes. Projects could be periodically brought up to date and, if conflicts occurred, they would be resolved on a case-by-case basis.
Of course, the principal benefit of source code control, besides a mediated way to centrally share code, was the ability to go "back in time" and see what had been done or even return to a previous checkin. Software development being the way it is, it was (and is) typical to release a product and immediately start working on the next planned release. If every release were perfect, this wouldn't cause any disruption, but in reality, past releases need periodic patches to fix security flaws and uncaught bugs. Version control systems developed the concept of branches to address this.
Being the command line fanatic that I am, I normally use source control entirely from the command line and within IDEs and other graphical tools only under protest, so all of the examples below will be command-line oriented.
Under Subversion, assuming that you have a server configured (which is, incidentally a requirement for
using Subversion but not, as we'll see, for using Git), you can put a set of files under version
control using the import command:
This makes a copy of every file under the current directory and replicates it on the target server so that
it's now available for collaboration.
$ svn import http://server.com/projectA -m "Initial import"
Incidentally, although it's not especially relevant to the average version control user, the files themselves are not stored as files anywhere on the server; they're stored in a compacted database, so you have to go through the subversion server to get them back out. This wasn't the case with older revision control systems like RCS and CVS.
Somewhat annoyingly, Subversion doesn't make the directory that you just imported version controlled - you
have to turn around and check it out somewhere else before Subversion recognizes it as being under version
control:
This copies all of the files that the initial importer uploaded in the first place down to your localhost,
along with a special control directory
$ svn checkout http://server.com/projectA
.svn that Subversion uses to keep track of what is and
isn't under version control. Once the project is checked out, the developer begins a workflow that goes
something like:
- Modify a file (or a few)
- Check for updates from other developers
- Commit changes
- Resolve conflicts when they arise between other developers
| Task | Command | Notes |
|---|---|---|
| Get a project from the server initially | svn checkout | |
| Check to see what's been modified locally | svn status | |
| Bring down latest changes from remote server | svn update | |
| Transmit local changes to remote server | svn commit | |
| Add new files | svn add | scheduled to be uploaded on next commit |
| Delete files | svn remove | scheduled to be removed on next commit |
| Create a new branch | svn copy | Operates on the server |
| Merge a branch into the current working directory | svn merge | Changes are scheduled for commit |
You can actually use Git exactly as you used Subversion, and if you're new to Git, you can ease yourself into it that way.
| Task | Command |
|---|---|
| Get a project from the server initially | git clone |
| Check to see what's been modified locally | git status |
| Bring down latest changes from remote server | git pull |
| Transmit local changes to remote server | git add; git commit; git push |
| Add new files | git add |
| Delete files | git rm |
| Create a new branch | git checkout -b |
| Merge a branch into the current working directory | git merge |
Probably the most confusing part of the table above, though, is the fourth line: "Transmit local changes to remote server"
which requires three individual commands (actually you can combine the first two into a single
git commit -a but practically nobody ever does). The fundamental conceptual disconnect
between Git and Subversion (and CVS, and RCS) is the idea that you do all of your revision control tasks
entirely locally and, at some point, synchronize them with a remote server. Rather than transmitting
entire files to the server and leaving it to the server to work out what has changed, you let Git work
out locally what the changes are and then transmit the details of those changes to the server. So the
git add; git commit sequence does do, in Git, exactly what it does in Subversion: it checks
the modified files into the repository — however, the repository is strictly local. It's contained
inside the local .git directory.
Another, maybe surprising, difference is in how Git handles the add command: svn add
is strictly used to indicate to Subversion that the named file should be tracked for version control from
now on. git add is used for the same purpose, but it's actually used to indicate that
any change should be tracked for version control. So, every time you edit a file, you have to
git add that file to indicate that the change that you made should be part of the next
commit. (Normally this isn't as big a burden as it seems — at some point, you'll just
git add everything you've modified and then git commit all of the modifications
that you just added).
But all of the adding and committing, under Git, is strictly local. Nobody else can see the changes that you've made yet. This is in stark contrast, and confusing for new users, to the Subversion model where the commit command is the final "yes, I really want to publish these changes and put them where everybody else can see them" command. Instead, with Git, you push your changes to the remote repository. Only then are the changes ready for another user to consume via the complementary pull command.
Since Git operates locally, you can actually play around with it and obtain a high comfort level without ever having to leave your own desktop environment. Assuming you have Git installed already (if you're on OS/X or Linux, you do), you can create a test file in a throwaway directory and create a local Git repository to keep track of it:
$ cat > todo.txt <<HERE
- Fix creaky door
- Clean pool pump
- Lawn seeding
- Trim tree branches
HERE
$ git init
Initialized empty Git repository in /tmp/.git/
This is a new concept for Subversion users; with Subversion, you had a somewhat equivalent command in
svn import, but unlike subversion, Git does put this directory under version control
immediately. You can verify this by looking at the .git directory that it created:
Also unlike Subversion, it doesn't add the files in the directory to version control. And, of course,
it doesn't do anything on the remote server because, at this point, there is no remote server yet.
$ ls .git/
config  description  HEAD  hooks  info  objects  refs
You can see that there are no files under version control by running git status:
$ git status
On branch master
No commits yet
Untracked files:
(use "git add
Git, as you can see, is helpfully verbose (this is definitely a departure from the philosophy of
earlier version control systems like Subversion and CVS). It tells you that you're in a version-controlled
directory (if you weren't, it would tell you fatal: Not a git repository (or any of the parent directories): .git). It also informs you that you're on branch master; just like Subversion which
doesn't have a built-in concept of a "mainline" or HEAD revision, but instead considers everything
a branch and leaves it up to you to consider one as being "special", Git tracks every change in a branch.
By default, that's called master. Nothing has been committed, but Git helpfully tells you how to put a file under version control. Go
ahead and do that now:
$ git add todo.txt
Now you can see that the file is scheduled for commit (by default git add just succeeds
silently):
$ git status
On branch master

No commits yet

Changes to be committed:
  (use "git rm --cached ..." to unstage)

        new file:   todo.txt
You probably also noticed the color coding; files not added (called untracked in Git parlance) are shown in red, and files not yet committed are shown in green.
$ git commit -m "added a file"
[master (root-commit) fc1ccc8] added a file
 1 file changed, 4 insertions(+)
 create mode 100644 todo.txt
If you're running Git for the first time, you might be prompted to complete some configuration:
The instructions themselves are pretty self explanatory.
$ git commit -m "added a file"


*** Please tell me who you are.


Run


  git config --global user.email "you@example.com"
  git config --global user.name "Your name"

to set your account's default identity.

Omit --global to set the identity only in this repository.
Now if you check the status, you'll see that there's nothing left to do:
$ git status
On branch master
nothing to commit, working tree clean
This should be a familiar workflow to a Subversion user, except that everything has taken place relative
to your localhost. So, let's say you want to share your todo list with the world. You could, of course,
run a Git server on your local machine and allow people to pull down or clone your repository directly
by running the git daemon command, but this is probably not a good idea;
you probably want a central server with a static IP address and a globally-resolvable host name (along with some
concept of security and authentication), just like you used to do with Subversion. Here's where Git starts to
diverge significantly from Subversion in terms of workflow. Since you've already committed your work,
the next step is to synchronize that work to a remote (shared) repository. If you're using Git, you're
most likely also using GitHub (but note that they're two different things - GitHub supports Git, but Git
doesn't necessarily imply GitHub). Your employer may have set up a local GitHub instance, or you may be
using the "central" one that's located at github.com; either way, you
need to set up an account to use it.
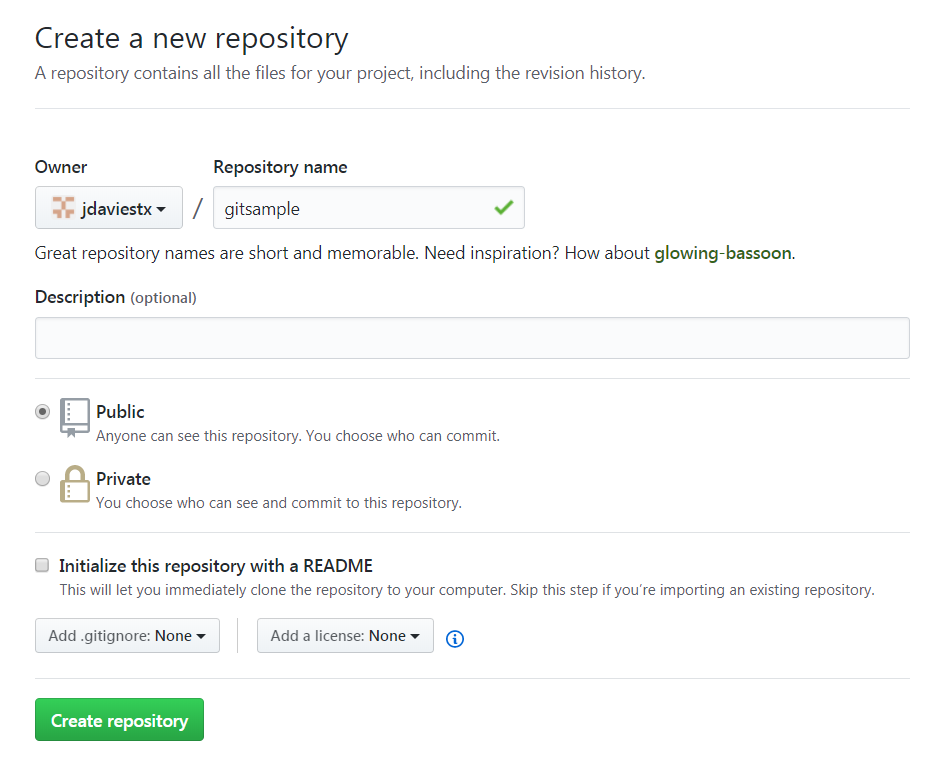
Somewhat surprisingly, though, you can't create a brand-new repository in GitHub remotely like you can with
Subversion's import command. Instead, you have to log in to GitHub and go to
start a project before you can actually push anything to it. The
only required field on the "Create a new repository" page is "Repository Name"; I'll use the name
gitsample here. (Of course, the owner will be your name, not jdaviestx — that's my
name).
Now, if you go back to your command line and run a push, the code is uploaded to the GitHub central server (note that everything on here is public by default, unless you're willing to fork over a few dollars to GitHub).
$ git remote add github https://github.com/jdaviestx/gitsample.git
$ git push github master
Username for 'https://github.com': jdaviestx
Password for 'https://jdaviestx@github.com':
Counting objects: 3, done.
Delta compression using up to 4 threads.
Compressing objects: 100% (2/2), done.
Writing objects: 100% (3/3), 287 bytes | 287.00 KiB/s, done.
Total 3 (delta 0), reused 0 (delta 0)
To https://github.com/jdaviestx/gitsample.git
 * [new branch]      master -< master
What I've done here is I've registered a remote repository named "jdaviestx/gitsample" and pushed all of my changes to it. I gave it a "nickname" of github so that I could refer to it later. You can now go back into the GitHub web console and see the new project (and, again, so can anybody else in the world!). Although I couldn't create the project from the command line, I have created a branch from the command line. To follow Git conventions, I've called it master.
Now, if somebody else wanted to contribute to your project, if you were using Subversion, they'd do a
svn checkout which would copy the current mainline (HEAD) to their local machine and
mark it as version controlled. With Git, instead, they would either pull or clone
the codebase. To pull it, your collaborator could do this:
$ git init
$ git remote add github https://github.com/jdaviestx/gitsample.git
$ git pull
(Notice that I didn't have to provide a password to pull down changes, only to upload/push them).
If you check the status of the newly downloaded project, you'll see that it's up-to-date:
$ git status
On branch master
nothing to commit, working tree clean
Most people don't do this to initially download a project, though, instead they do a clone
which is sort of a shortcut for init/remote add/pull.
$ git clone https://github.com/jdaviestx/gitsample.git
Cloning into 'gitsample'...
remote: Counting objects: 3, done.
remote: Compressing objects: 100% (2/2), done.
remote: Total 3 (delta 0), reused 3 (delta 0), pack-reused 0
Unpacking objects: 100% (3/3), done.
If you check the status of the cloned project, you'll see that it's just slightly different than the status of the previously pulled project:
$ git status
On branch master
Your branch is up-to-date with 'origin/master'.
nothing to commit, working tree clean
It's now telling me that my branch is up-to-date with 'origin/master'. "master" looks familiar; that's
the main branch. But what is "origin"? Well, remember that I skipped the git remote add github
part of the download; origin is Git's default name for the first remote repository. Git called it
origin to be generic whereas I called it github to be more descriptive here.
Now, if there are default branches, you can probably guess that you can create your own branches. Just
as Subversion has no dedicated "branch creation" command but instead has the svn copy command,
git actually overloads the checkout command as a branch create/switch command. You can create a
new branch using:
$ git checkout -b branch1
Switched to a new branch 'branch1'
(Note the -b parameter that indicates that Git should consider this a new branch).
At the moment, you haven't changed anything, but Git does remember that I'm on branch branch1:
$ git status
On branch branch1
nothing to commit, working tree clean
Here's where Git can be a bit confusing if you're new to it. Make a change to the todo list:
$ cat >> todo.txt <<HERE
> - Grocery shopping
> HERE
Now git recognizes that I've made a modification:
$ git status
On branch branch1
Changes not staged for commit:
  (use "git add ..." to update what will be committed)
  (use "git checkout -- ..." to discard changes in working directory)

        modified:   todo.txt

no changes added to commit (use "git add" and/or "git commit -a")
You may expect that, if you switch back to the master branch that you started from, this change would disappear. As it turns out, this isn't the case:
$ git checkout master
Switched to branch 'master'
M       todo.txt

$ git status
On branch master
Changes not staged for commit:
  (use "git add ..." to update what will be committed)
  (use "git checkout -- ..." to discard changes in working directory)

        modified:   todo.txt

no changes added to commit (use "git add" and/or "git commit -a")
Git introduces the concept of a working directory independent of the staging area. The staging area is the set of changes that Git is tracking, and the working directory is just your copy of those files. Now, if you commit that change, then a subsequent checkout will change the text of the todo list:
$ git add todo.txt
$ git commit -m "added grocery list"
[master 5189ff7] added grocery list
 1 file changed, 1 insertion(+)
$ git status
On branch master
nothing to commit, working tree clean
$ git checkout branch1
Switched to branch 'branch1'
$ cat todo.txt
- Fix creaky door
- Clean pool pump
- Lawn seeding
- Trim tree branches
(Remember that I switched to branch master, so this commit is relative to master). When I switched to branch1, it reverted to the original todo list even though I was on that branch when I made that change. What matters to Git is what branch I was on when I committed the change. Now watch what happens if I make another change to the todo list and then try to switch back to master:
$ cat >> todo.txt <<HERE
> - Change oil
> HERE

$ git checkout master
error: Your local changes to the following files would be overwritten by checkout:
        todo.txt
Please commit your changes or stash them before you switch branches.
Aborting
In order to switch to the master branch, Git would have to overwrite my change, which may have been
important, so it's going to leave it up to me to check it in (so it can be recovered) or revert it.
(Reverting is accomplished using the completely unintuitive git checkout -- file
command). Now go ahead and commit this change:
$ git add todo.txt
$ git commit -m "added oil change"
[branch1 b347165] added oil change
 1 file changed, 1 insertion(+)
$ git checkout master
Switched to branch 'master'
$ cat todo.txt
- Fix creaky door
- Clean pool pump
- Lawn seeding
- Trim tree branches
- Grocery shopping
This was safe, because your changes were committed to the branch branch1. Now, you can merge these
changes back into master using the merge command:
$ git merge branch1
Auto-merging todo.txt
CONFLICT (content): Merge conflict in todo.txt
Automatic merge failed; fix conflicts and then commit the result.
No surprises here, though: I changed the same line of the same file in two different branches, so I got a conflict, just like I would have in Subversion. In fact, it's flagged just like you're used to:
$ cat todo.txt
- Fix creaky door
- Clean pool pump
- Lawn seeding
- Trim tree branches
<<<<<<< HEAD
- grocery shopping
=======
- Change oil
>>>>>>> branch1
Git, however, doesn't have a dedicated "resolve" command like Subversion does; with Git, just edit the file, add it and commit it, and the conflict is resolved. But remember, as always, everything I've done here has been local. Unless I push to the remote repository, I've done all of this branching and merging relative to myself. Remember, though, that what I push to the remote repository is a branch. If I push my new master branch to Github at this point, Git will see four commits:
- added grocery list
- added oil change
- resolved conflict
But it won't know anything about branch1 (notice that the second commit message was the one that I committed to branch1; I inherited that message into master when I did the merge). I can push branch1 if I want to, but it's not required.
Add a comment:
Completely off-topic or spam comments will be removed at the discretion of the moderator.
You may preserve formatting (e.g. a code sample) by indenting with four spaces preceding the formatted line(s)